
『 PicasaでDfGalleryのXMLと画像をエクスポート(2) 』 のつづきです。
右下のウィンドウ・アイコンをクリックすることでフルスクリーン・モードにもできます
作業の中では今日の投稿、 gallery.xml を編集してアップロードする というのが一番面倒と言えば面倒ですが、Picasa でエクスポートされたファイルを開き、[ すべて選択 ]&[ コピー ]、そのあとダウンロードしておいた gallery.xml にペーストしてアップロードするという、要領さえつかめてしまえばお子さんでもじゅうぶん可能な作業です。
まずは gallery.xml の編集作業に移る前に Picasa のどの部分が gallery.xml のどこに反映されているか確かめてみることにします。
これをよく理解して Picasa に新しい写真が読み込まれるたびにしっかりそのフォルダ(写真)を整理しておけばいつでも簡単にわかりやすいフォトギャラリーを作り上げることができます。。。と思います 
gallery.xml について
以下、画像内の 「丸の中に数字」 は機種依存文字なので文中は 「カッコに数字」 で書きます。
Picasa からエクスポートされた gallery.xml をテキストエディタ等で開きます。
ここではわかりやすいように一枚だけ写真を読み込んだ gallery.xml を載せます。

↑ 拡大してドラッグ (移動可) ↑
最初の <album> から 最後の </album> までがひとつのアルバムです。Picasa で言えばフォルダのようなものです。したがって、DfGallery 上でアルバムがふたつになれば <album> と </album> で区切られた場所が 2 つ分 gallery.xml 上に記述されますし、アルバムが 3 つになればそれは3つに増えます。
実際の gallery.xml がどういうカタチで記述されているのか、最初の投稿 PicasaでDfGalleryのXMLと画像をエクスポート(1) に載せてある Demo の gallery.xml をご覧いただければよくわかると思います。
http://www.photoclip.net/wp-content/uploads/dfgallery1/gallery.xml
<image> と </image> で区切られたところが写真一枚分の情報です。コレを手作業で打っていくのが果てしなく大変なので Picasa にテンプレートを入れて<album> から </album> のところだけ画像と一緒にイッキにエクスポートしてしまおうと言うわけです。
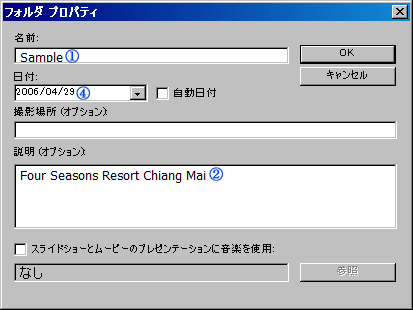
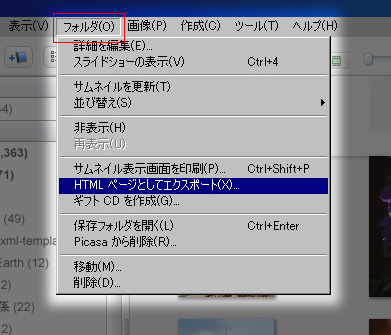
Picasa のメニューバーにある [ フォルダ ] → [ 詳細を編集 ] で開く [ フォルダ プロパティ ] ウィンドウ内に gallery.xml に反映される記述がいくつかあります。
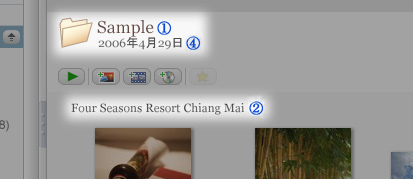
下の画像内にある番号 (1) (4) (2) は上に載せてある gallery.xml の番号にとリンクしています。
↓
↓
Picasa に写真を読み込ませたらこの [ フォルダプロパティ ] を開き、すぐに名前と説明を入れておけば他のテンプレートでエクスポートするときにも役に立ちます。このテのことは 「あとでいいや」 と後回しにすると、おそらく一生やらないと思うのですぐにやってしまいましょう。。。。という私もそのクチですが(苦笑)
次に <album> と </album> に挟まれた<image>~</image>を見てみましょう。
↑ 拡大してドラッグ (移動可) ↑
- (3) →テンプレートのデフォルトはファイル名にしています
- (4) →Picasa が自動的に付けてくれます。Exif から拾っているのですかね。英語環境で使えば英語表記になります。日本語以外の言語にするにはメニューバーの [ ツール ] → [ オプション ] → [ デフォルト ]タブの下のほうにあるドロップダウンリスト [ メニューおよびダイアログで使用する言語 ]で選択します。
- (5) (6) →テンプレートのデフォルトはファイル名にしています
-
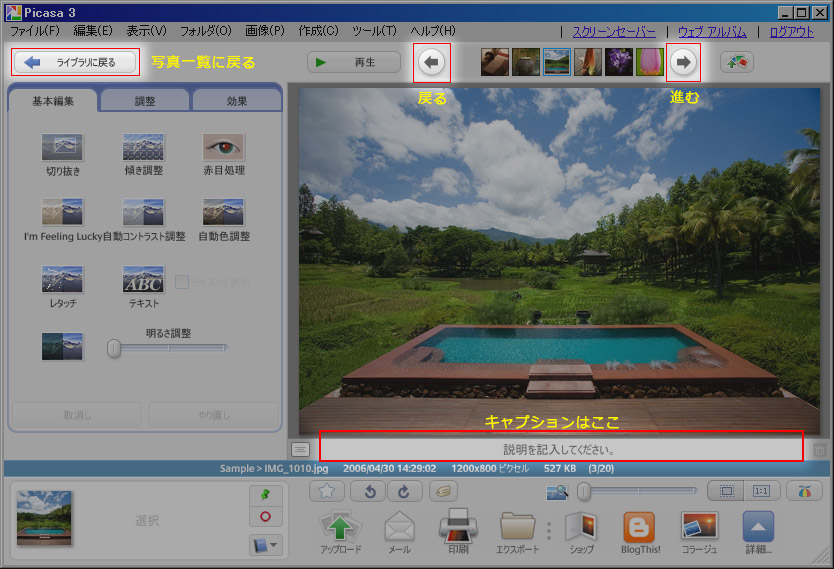
(7) →自分の好きなキャプション(画像の説明)をつけることができます。
ライブラリ上(Picasa の通常画面上)で写真をダブルクリックして写真編集画面にするとキャプションを記入する場所がありますのでそこに入力してください。下記の画像参照のこと。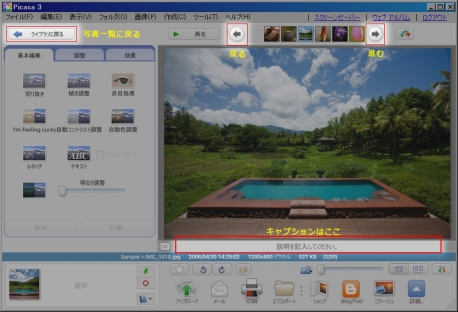
話しはそれますが、日本人にとって DfGallery 1.0 の弱点はこのキャプションだと思います。
すべて英語なら問題ないのですが、日本語、特に漢字を使うとフォントサイズが小さいので画数の多い漢字はつぶれてしまうんです。。。少数派ですから仕方がないですね(苦笑)
さて、 gallery.xml の内容がわかったところであとは Picasa でエクスポートした gallery.xml をサーバーにアップしてある gallery.xml にコピペする作業です。
エクスポートしたgallery.xmlをサーバーにアップしてあるgallery.xmlに貼り付ける
- まずサーバーから gallery.xml ダウンロードします。
いきなりこの文章を読んでなんのことかわからない方は (1) をお読み下さい - エクスポートした gallery.xml をテキストエディタ等で開き gallery.xml に記述されているものすべて選択しコピーします。
(Picasa でエクスポートした gallery.xml の記述をすべてコピーするということ。) - ダウンロードした gallery.xml を開きます。
<?xml version="1.0" encoding="utf-8"?>
	<gallery>
		<!--

					dfGallery

			Author	: G.S.Navin Raj Kumar
			URL		: http://dezinerfolio.com
			Date	: 14-June-2007
			Version : 1.0b

			PLEASE READ THE DOCUMENTATION CAREFULLY BEFORE MODIFYING THIS FILE.

		-->
		<!-- configure the gallery in this xml-node -->
		<config>

			<!-- set the title of the album -->
			<title>アルバムタイトルを入れて下さい</title>

			<!-- set the location of the thumbnails relative to the gallery.swf -->
			<thumbnail_dir>images/thumbnails/</thumbnail_dir>

			<!-- set the actlocation of the actual high-res images relative to the gallery.swf -->
			<image_dir>images/images/</image_dir>

			<!-- the time interval for each image to display, this value is in seconds
			default value : 5
			-->
			<slideshow_interval>5</slideshow_interval>

			<!-- pause slideshow at start
			default value : false
			-->
			<pause_slideshow>false</pause_slideshow>

			<!-- set true if you want the application to scale the images while using RSS feeds
			default value : true
			-->
			<rss_scale_images>true</rss_scale_images>

			<!-- set the path of the mp3 file that should loop as a background music while playing the slideshow.
			default value : none
			-->
			<background_music>Johnny Quest.mp3</background_music>

			<!-- percentage of the volume to set while playing the music
			default value : 50
			-->
			<background_music_volume>50</background_music_volume>

			<!-- add links to images, and allow the views to click on images from flickr, picasa,and
			view the page where the actual image is found.
			If you dont want views to visit the picasa, or flickr or other sites keep this value false.
			default value : false
			-->
			<link_images>false</link_images>

			<!--
			Photographers will like to disable printscreen for their pictures
			to increase the security of their photographs.
			Set this value to true if you wish to disable print screen in the application.
			While the application is running the print screen option will be completely disabled in
			all other applications that the visitor is using.

			default value : false
			-->
			<disable_printscreen>false</disable_printscreen>

		</config>


		<!-- this node contains all the albums -->
		<albums>

<albums> と </albums> に囲まれたここに
Picasa でエクスポートしたアルバムごとの XML を
どんどん貼り付けていきます

		</albums>

		<!--  language support added in v 1.0b	-->

		<language>
			<string id="please wait" value="Please wait" />
			<string id="loading" value="Loading" />
			<string id="previous page" value="Previous Page" />
			<string id="page % of %" value="Page % of %" />
			<string id="next page" value="Next Page" />
		</language>

	</gallery>
<albums> と </albums> の間にペースト(貼り付け)します。
- gallery.xml の全体の構成を簡略化すると以下のような構成になります。
<?xml version="1.0" encoding="utf-8"?>
	<gallery>

		<config>

DfGallery 1.0 の設定

		</config>

		<albums>


<album title="◆◆" ・・・> アルバム </album>

<album title="●●" ・・・> アルバム </album>

<album title="▼▼" ・・・> アルバム </album>

           ・
           ・
           ・
		</albums>

		<language>
			<string id="please wait" value="Please wait" />
			<string id="loading" value="Loading" />
			<string id="previous page" value="Previous Page" />
			<string id="page % of %" value="Page % of %" />
			<string id="next page" value="Next Page" />
		</language>

	</gallery>
ペーストする場所を間違えないように気をつけて作業してください。
保存が終了したら gallery.xml をサーバーへ上書きアップロードすれば終了です。
サーバー上の gallery.xml は常にバックアップをとっておくことをおすすめします。
アルバムが 2 つ 3 つのときは作業ミスが起こっても取り返しがつきますが、数が増えてくるとひとつの作業ミスが命取りになります。
サーバーから gallery.xml をダウンロードしたらすぐコピーを作って決まったフォルダに入れておきましょう。
さて DfGallery 1.0 は無事表示されましたか?
なお、これを WordPress 内で使うには Picasa のテンプレートを修正する必要があります。
3 投稿にまたがりどうもお疲れさまでした 

コメント